Kicks Condor
01 May 2018

This post accepts webmentions. Do you have the URL to your post?

You may also leave an anonymous comment. All comments are moderated.

F.A.T. Lab is Dead

Geez I was really hoping the ending would reveal that they were all dead the whole time. Now we’re going to need to band together, in order to resist this intoxicating urge to deify F.A.T.

This post accepts webmentions. Do you have the URL to your post?

You may also leave an anonymous comment. All comments are moderated.

This post accepts webmentions. Do you have the URL to your post?

You may also leave an anonymous comment. All comments are moderated.

This post accepts webmentions. Do you have the URL to your post?

You may also leave an anonymous comment. All comments are moderated.

This post accepts webmentions. Do you have the URL to your post?

You may also leave an anonymous comment. All comments are moderated.

This post accepts webmentions. Do you have the URL to your post?

You may also leave an anonymous comment. All comments are moderated.

The World of JSON Exposed

An incredibly thorough review of JSON specifications and parsers. Fantastic criticism of the RFC, but beyond that: the benchmarking and concise bug hunting here is something every parser project should count themselves lucky to have.

This post accepts webmentions. Do you have the URL to your post?

You may also leave an anonymous comment. All comments are moderated.

09 Mar 2018

Fables of Tables #1

Rising Sun: The Shame and Sorrows of Godzilla

In my first game of Rising Sun, a Kaiju came in from the sea—and what happened next brought a profound mix of delight and sadness.

This is the first in my Fables of Tables series. It’s a type of review series. But instead of dryly reviewing the game’s mechanics and stamping some harsh grade on its face, I’m just going to tell a story.

Today’s game is Rising Sun. This is a miniatures game—full of plastic monsters. I don’t really play miniatures games, but a friend had a copy so it just happened. And, what the blazes? A miniatures game in pastels?

Midway through the game, I noticed that you could buy a giant Godzilla-like monster to have in your crew.

Daikaiju, so not exactly Godzilla, but hey.

“What’s the Godzilla do?” I asked.

And the friend who owns the game—I’ll call him Hustle—says, “Oh, he has five force.” So he’s huge—his power is equal to five whole army guys.

He goes on to explain that when you buy the Kaiju, you put him out in the sea—the whole board is a rough map of Japan and there is water surrounding the islands—so you put the monster out there, and then during battle you can spring him on to any of the game’s provinces and he’ll destroy all the buildings there. (The buildings are these strongholds where your units can appear.)

“Oh man!” I’m thinking. “Just like Godzilla! I love it! I gotta have it!”

I just really enjoy monster movies—particularly Shin Godzilla—that wail that sounds like metal sheets tearing and that slow, sinuous tail as he moves methodically through the cityscape. I get that he’s historically out of place in this game, but I don’t care! He is the force of the Earth fighting back against civilization—what if he could have done this in some bygone age?

The guy playing purple (don’t recall his name) buys the Kaiju before I can. This player is already in the lead and now has Godzilla, placing him in the sea. It is as if two titans of this world have allied and we are waiting for our defeat.

I look on wistfully at this being. Five force! I am in awe and I sit in anticipation of what the lurking god will do when war begins.


War arrives and the fellow playing purple brings Godzilla on to land in the northern province of Hokkaido. The Kaiju storms into the scene and—well, there are no buildings there—he has no effect. But still—this is an island teaming with monsters and warriors and look how Godzilla towers above them!!

Hustle reaches across the giant board and points. “Ok, so, you see, I have the Earth Dragon here.”

Hot snakes, I had forgotten about the Earth Dragon! So the Earth Dragon does not have the force that Godzilla has. However, the Earth Dragon is able to push away one unit from each opponent in the battle. It is as if the Earth Dragon takes a big breath and then >SNUFF< a bunch of guys fly off to other parts of the island.

Of course, he chooses to snuff off Godzilla. The Earth Dragon takes a big breath and a myriad of warriors and creatures scatter across the map. Godzilla is propelled all the way across the board—using a marked sea lane, I should add, since the winds of the dragons respect these rules as well—and he lands in Kyushu, destroying a few buildings when he lands.

War rages on and, before long, the spotlight shines on Kyushu. Godzilla has picked up the pieces and, with some tarnished pride, admirably overshadows the vast assembly of demons and gods there.

“Hang on,” says the player to my right, “my Fire Dragon goes first.”

Holy cats! Right! The Fire Dragon! This twisty, devious dragon coughs his terrible fireballs just as the battle forms—incinerating one unit for each opponent present in the conflict. Warriors and barbaric creatures fall away in the fire—and Godzilla himself, no, it can’t be! Can it??

Gods, it is true! The vast unshakable behemoth is now wildly dashing from the island in a pyre of his own burning scales. He tumbles down the beach, a maniacally flailing lizard, a lizard of flame and agony, howling his metal-rending chord.

The great Kaiju sinks back into the ocean—in shame and sorrow—having made no effect on the actual game at all. Like we never did any math with Godzilla involved. Literally no effect.


I sat there for some time after the game had concluded. Stunned and humbled. I contemplated the fate of Godzilla. Perhaps even the great gods get tossed and squashed and embarassed on a bad day.

Perhaps when I die, my Guardian—or my Saint or Kami—will approach me to greet me into a new kingdom. And she, too, may trip and fall into fire, to be engulfed and never seen again. These things happen. I realize that now.

This post accepts webmentions. Do you have the URL to your post?

You may also leave an anonymous comment. All comments are moderated.

26 Oct 2017

This post accepts webmentions. Do you have the URL to your post?

You may also leave an anonymous comment. All comments are moderated.

25 Oct 2017

This post accepts webmentions. Do you have the URL to your post?

You may also leave an anonymous comment. All comments are moderated.

24 Jan 2017

This post accepts webmentions. Do you have the URL to your post?

You may also leave an anonymous comment. All comments are moderated.

31 Jan 2016

This post accepts webmentions. Do you have the URL to your post?

You may also leave an anonymous comment. All comments are moderated.

13 Jan 2016

This post accepts webmentions. Do you have the URL to your post?

You may also leave an anonymous comment. All comments are moderated.

12 Jan 2016

This post accepts webmentions. Do you have the URL to your post?

You may also leave an anonymous comment. All comments are moderated.

08 Jan 2016

Makey Makey No Longer Supports Arduino

While trying to get JoyLabz Makey Makey 1.2 to work with an iPad, I discovered there is no way to reprogram it.

It seems like this information hasn’t been disclosed quite enough as it should: Makey Makey’s version 1.2, produced by JoyLabz, cannot be reprogrammed with the Arduino software. In previous versions, you could customize the firmware — remap the keys, access the AVR chip directly — using an Arduino sketch.

🙌 NOTE: Dedokta on Reddit demonstrates how to make a Makey Makey.

Now, this isn’t necessarily bad: version 1.2 has a very nice way to remap the keys. This page here. You use alligator clips to connect the up and down arrows of the Makey Makey, as well as the left and right arrows, then plug it into the USB port. The remapping page then communicates with the Makey Makey through keyboard events. (See Communication.js.)

This is all very neat, but it might be nice to see warnings on firmware projects like this one that they only support pre-1.2 versions of the Makey Makey. (I realize the page refers to “Sparkfun’s version” but it might not be clear that there are two Makey Makeys floating about—it wasn’t to me.)

UPDATE: The text on the chip of the version 1.2 appears to read: PIC18F25K50. That would be this.

Some Notes About Connecting to iPads

Now, how I came upon this problem was while experimenting with connecting the Makey Makey to an iPad. Instructions for doing this with the pre-1.2 Makey Makey are here in the forums—by one of the creators of the MM.

Observe the iPad jealously guarding its precious battery juices.

With the 1.2 version, it appears that the power draw is too great. I received this message with both an iPad Air and an original iPad Mini.

Obviously a Makey Makey isn’t quite as interesting with an iPad — but I was messing with potentially communicating through a custom app.

Anyway, without being able to recompile the firmware, the iPad seems no longer an option. (The forum post should note this as well, no?)

Interfacing the Sparkfun Makey Makey with Arduino 1.6.7

If you do end up trying to get a pre-1.2 Makey Makey working with the latest Arduino, I ran into many problems just getting the settings right. The github repos for the various Makey Makey firmwares are quite dated.

One of the first problems is getting boards.txt to find my avr compiler. I had this problem both on Linux and Windows. Here’s my boards.txt that finally clicked for me:

############################################################################
menu.cpu=Processor
############################################################################
################################ Makey Makey ###############################
############################################################################
makeymakey.name=SparkFun Makey Makey
makeymakey.build.board=AVR_MAKEYMAKEY
makeymakey.build.vid.0=0x1B4F
makeymakey.build.pid.0=0x2B74
makeymakey.build.vid.1=0x1B4F
makeymakey.build.pid.1=0x2B75
makeymakey.upload.tool=avrdude
makeymakey.upload.protocol=avr109
makeymakey.upload.maximum_size=28672
makeymakey.upload.speed=57600
makeymakey.upload.disable_flushing=true
makeymakey.upload.use_1200bps_touch=true
makeymakey.upload.wait_for_upload_port=true
makeymakey.bootloader.low_fuses=0xFF
makeymakey.bootloader.high_fuses=0xD8
makeymakey.bootloader.extended_fuses=0xF8
makeymakey.bootloader.file=caterina/Caterina-makeymakey.hex
makeymakey.bootloader.unlock_bits=0x3F
makeymakey.bootloader.lock_bits=0x2F
makeymakey.bootloader.tool=avrdude
makeymakey.build.mcu=atmega32u4
makeymakey.build.f_cpu=16000000L
makeymakey.build.vid=0x1B4F
makeymakey.build.pid=0x2B75
makeymakey.build.usb_product="SparkFun Makey Makey"
makeymakey.build.core=arduino
makeymakey.build.variant=MaKeyMaKey
makeymakey.build.extra_flags={build.usb_flags}

I also ended up copying the main Arduino platform.txt straight over.

Debugging this was difficult: arduino-builder was crashing (“panic: invalid memory address”) in create_build_options_map.go. This turned out to be a misspelled “arudino” in boards.txt. I later got null pointer exceptions coming from SerialUploader.java:78 — this was also due to using “arduino:avrdude” instead of just “avrdude” in platforms.txt.

I really need to start taking a look at using Ino to work with sketches instead of the Arduino software.

This post accepts webmentions. Do you have the URL to your post?

You may also leave an anonymous comment. All comments are moderated.

31 Dec 2015

Switching PWM to Another Pin

Sometimes your PWM pin is tied up doing SPI. You can still salvage the PWM timer itself, though.

Right now the spotlight is stolen by lovely chips like the ESP8266 and the BCM2835 (the chip powering the new Raspberry Pi Zero). However, personally, I still find myself spending a lot of time with the ATtiny44a. With 14 pins, it’s not as restrictive as the ATtiny85. Yet it’s still just a sliver of a chip. (And I confess to being a sucker for its numbering.)

My current project involves an RF circuit (the nRF24l01+) and an RGB LED. But the LED needed some of the same pins that the RF module needs. Can I use this chip?

The Rise and Fall of PWM

The LED is controlled using PWM — pulse-width modulation — a technique for creating an analog signal from code. PWM creates a wave — a rise and a fall.

PWM Wave

This involves a hardware timer — you toggle a few settings in the chip and it begins counting. When the timer crosses a certain threshold, it can cut the voltage. Change the threshold (the OCR) and you change the length of the wave. So, basically, if I set the OCR longer, I can get a higher voltage. If I set a lower OCR, I get a lower voltage.

I can have the PWM send voltage to the green pin on my RGB LED. And that pin can be either up at 3V (from the two AA batteries powering the ATtiny44a) or it can be down at zero — or PWM can do about anything in between.

My problem, though, was that the SPI pins — which I use to communicate with the RF chip — overlap my second set of PWM pins.

ATtiny24/44 Pinout

You see — pin 7 has multiple roles. It can be OC1A and it can also be DI. I’m already using its DI mode to communicate with the RF module. The OC1B pin is similarly tied up acting as DO.

I’m already using OC0A and OC0B for my green and blue pins. These pins correspond to TIMER0 — the 8-bit timer used to control those two PWM channels on OC0A and OC0B. To get this timer working, I followed a few steps:

// LED pins
#define  RED_PIN   PA0
#define  GREEN_PIN PB2
#define  BLUE_PIN  PA7

Okay, here are the three pins I want to use. PB2 and PA7 are the TIMER0 pins I was just talking about. I’m going to use another one of the free pins (PA0) for the red pin if I can.

DDRA |= (1<<RED_PIN) | (1<<BLUE_PIN);
DDRB |= (1<<GREEN_PIN);

Obviously I need these pins to be outputs — they are going to be sending out this PWM wave. This code informs the Data Direction Register (DDR) that these pins are outputs. DDRA for PA0 and PA7. DDRB for PB2.

// Configure timer0 for fast PWM on PB2 and PA7.
TCCR0A = 3<<COM0A0 | 3<<COM0B0 // set on compare match, clear at BOTTOM
       | 3<<WGM00; // mode 3: TOP is 0xFF, update at BOTTOM, overflow at MAX
TCCR0B = 0<<WGM02 | 3<<CS00; // Prescaler 0 /64

Alright. Yeah, so these are TIMER0’s PWM settings. We’re turning on mode 3 (fast PWM) and setting the frequency (the line about the prescaler.) I’m not going to go into any detail here. Suffice to say: it’s on.

// Set the green pin to 30% or so.
OCR0A = 0x1F;
// Set the blue pin to almost the max.
OCR0B = 0xFC;

And now I can just use OCR0A and OCR0B to the analog levels I need.

TIMER1, 16-bit is Better, Right?

Most of these AVR chips have multiple timers and the ATtiny44a is no different — TIMER1 is a 16-bit timer with hardware PWM. Somehow I need to use this second timer to power th PWM on my red pin.

I could use software to kind of emulate what the hardware PWM does. Like using delays or something like that. The Make: AVR Programming book mentions using a timer’s interrupt to handcraft a hardware-based PWM.

This is problematic with a 16-bit timer, though. An 8-bit timer maxes out at 255. But a 16-bit timer maxes out at 65535. So it’ll take too long for the timer to overflow. I could lower the prescaler, but — I tried that, it’s still too slow.

Then I stumbled on mode 5. An 8-bit PWM for the 16-bit timer. What I can do is to run the 8-bit PWM on TIMER1 and not hook it up to the actual pin.

// Setup timer1 for handmade PWM on PA0.
TCCR1A = 1<<WGM10; // Fast PWM mode (8-bit)
                   // TOP is 0xFF, update at TOP, overflow at TOP
TCCR1B = 1<<WGM12  // + hi bits
        | 3<<CS10;  // Prescaler /64

Okay, now we have a second PWM that runs at the same speed as our first PWM.

What we’re going to do now is to hijaak the interrupts from TIMER1.

TIMSK1 |= 1<<OCIE1A | 1<<TOIE1;

Good, good. OCIE1A gives us an interrupt that will go off when we hit our threshold — same as OCR0A and OCR0B from earlier.

And TOIE1 supplies an interrupt for when the thing overflows — when it hits 255.

Now we manually change the voltage on the red pin.

ISR(TIM1_COMPA_vect) {
    sbi(PORTA, RED_PIN);
}
ISR(TIM1_OVF_vect) {
    cbi(PORTA, RED_PIN);
}

And we control red. It’s not going to be as fast as pure PWM, but it’s not a software PWM either.

Why Not Use Another Chip?

I probably would have been better off to use the ATtiny2313 (which has PWM channels on separate pins from the SPI used by the RF) but I needed to lower cost as much as possible — 60¢ for the ATtiny44a was just right. This is a project funded by a small afterschool club stipend. I am trying to come up with some alternatives to the Makey Makey — which the kids enjoyed at first, but which alienated at least half of them by the end. So we’re going to play with radio frequencies instead.

I imagine there are better other solutions — probably even for this same chip — but I’m happy with the discovery that the PWM’s interrupts can be messed with. Moving away from Arduino’s analogWrite and toward manipulating registers directly is very freeing — in that I can exploit the chip’s full potential. It does come with the trade off that my code won’t run on another chip without a bunch of renaming — and perhaps rethinking everything.

Whatever the case, understanding the chip’s internals can only help out in the long run.

If you’d like to see the code in its full context, take a look through the Blippydot project.

This post accepts webmentions. Do you have the URL to your post?

You may also leave an anonymous comment. All comments are moderated.

07 Oct 2015

This post accepts webmentions. Do you have the URL to your post?

You may also leave an anonymous comment. All comments are moderated.

27 Jul 2015

I Believe (The Nicolas Cage Speech)

A speech I like to give—my beliefs wrt Nicolas Cage.

This is a speech I like to give my students about my beliefs with regard to Nicolas Cage, to clear up any misunderstanding. Please contact my office if you would like me to give this speech at your school or at a civic meeting.

Let’s get right to it.

I believe in Nicolas Cage.

I believe he is real.

I believe that he is not a projection of my mind. I could not have invented Nicolas Cage—that much I know.

I believe he lives.

I believe that he believes that he lives. Which I find even more convincing.

I believe in him—that he’ll go far in life. He already has gone far, yes, but he will go far again and again.

I believed him in National Treasure when he said he would be stealing The Declaration of Independence. He did.

I believed him in National Treasure 2 when he said he would be kidnapping The President of the United States of America. He did.

I believe in the “nouveau shamanic” style of acting that this man employs.

And so I believe that there was no script for the National Treasure movies. I believe we are simply watching a man go about his daily routine. I believe that, right now, Nicolas Cage is solving national mysteries and nerding out over rare coins. He could be travelling back in time to kill Betsy Ross. He could be fighting a giant lizard-enhanced Benedict Arnold and walking on a bridge made of rare historical documents—a bridge which he himself made using a power like Iceman has—but with rare historical documents in place of ice.

I believe Diane Kruger is with him on these escapades.

I believe the quiver-like document case that he has slung over his shoulder, and which he often carries The Declaration of Independence in, except when he’s faking out Sean Bean’s character, is made from the hollowed out wooden leg of President Zachary Taylor. I believe that, at the time of his presidency, people suspected that Zachary Taylor had a wooden leg—but they said nothing, because it was possible he was using it to traffick state secrets and important rare and historical documents.

However, I believe that President Taylor NEVER COULD HAVE imagined that his leg would one day carry The Declaration of Independence. I believe this information would have been too much. I believe he would have turned away from his destiny and began a new quest to destroy the leg, in a misguided attempt to save The Declaration of Independence.

But I believe you can’t change the timeline. I believe everything happened as it should. I believe in the vindication of the Gates family. I believe Diane Kruger should have rightfully had the missing 1789 button for George Washington’s inauguration and that part of Nicolas Cage’s destiny was to help her complete the full set. It makes sense and I believe Diane Kruger collects masonic aprons as well.

I believe that they DID heat up the back of The Declaration of Independence together with their breath, though I believe Nicolas Cage’s breath accounted for more than two-thirds of that exhalatory heat. I believe that Diane Kruger’s breath was very hot as well, though, considering that it only took them one breath—and not even a particularly strong one at that—though not a bad one either—a good breath—a generous but not strengthful breath—just one breath to heat up the whole corner of The Declaration of Independence. I mean that’s pretty good!

I believe the “national treasure” referred to in the title of the film series is not The Declaration of Independence, nor is it The President of the United States, nor is it the sweet steampunk glasses of Benjamin Franklin—I believe it’s Nicolas Cage duh.

This post accepts webmentions. Do you have the URL to your post?

You may also leave an anonymous comment. All comments are moderated.

24 Jul 2015

This post accepts webmentions. Do you have the URL to your post?

You may also leave an anonymous comment. All comments are moderated.

23 Jul 2015

This post accepts webmentions. Do you have the URL to your post?

You may also leave an anonymous comment. All comments are moderated.

This post accepts webmentions. Do you have the URL to your post?

You may also leave an anonymous comment. All comments are moderated.

11 Jul 2015

Running OpenFL Stuff on an iPad—No Jailbreak and No $99

Using Xcode 7’s new ‘sideloading’ to prototype.

OpenFL is good. It is pleasing. This we know. It makes computer programs. However, it is itself one of these programs. Gah! So it is actually very bad and frustrating! But oh how we love it still—we needn’t be primates.

Okay, let’s see how good it is with the new Xcode. This new Xcode 7 lets us sideload. Yes, it’s true. It lets us put our mobile programs into our mobile computers without anything special—without a premium account of any kind or any permission—as if we were now in control.

Xcode Sideloading

How it does this is by granting us little licenses through a plain, average Apple ID. We will need to tell Xcode about our account. And we will need to create these things called provisioning profiles for each one of our apps. And we will need to click the Fix Issue button many times. More to come on that.

For this, you must have OpenFL installed for Mac. Download the latest Haxe from that page and then run, in a Terminal:

$ haxelib install openfl
$ haxelib run openfl setup

Now, let’s get a sample going.

$ openfl create NyanCat iNyanCat
$ cd iNyanCat

OpenFL already has a number of sample programs—we’re copying the built-in NyanCat sample for our purposes. It’s true that Nyan Cat is not as funny as it used to be, but it is funny enough for Xcode to at least compile.

Edit the project.xml file in there.

<meta title="NyanCat" package="org.openfl.samples.nyancat" 
  version="1.0.0" company="OpenFL" />

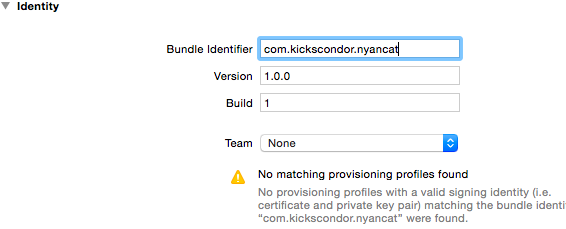
Best to change the Bundle Identifier. (The package setting above.) This has to be globally unique (as in one-of-a-kind on all of planet Earth) so put something in that’s peculiar.

<meta title="NyanCat" package="com.kickscondor.nyancat" 
  version="1.0.0" company="OpenFL" />

I am also using the beta release of Xcode 7. So it was necessary to use xcode-select to point OpenFL in the right direction.

$ sudo xcode-select -s /Applications/Xcode-beta.app/Contents/Developer 

Right ok. Back to trying to get this thing to come up.

$ openfl test ios

The openfl test ios command will be very chatty—screens and screens for several minutes. It is making something for us.

⛺ Plug in the iPad or iPhone at this point. If this is your first time connecting it, tell it to Trust this computer.

Hold up.

=== BUILD TARGET NyanCat OF PROJECT NyanCat WITH CONFIGURATION Re
lease ===
Check dependencies
Code Sign error: No matching provisioning profiles found: No prov
isioning profiles with a valid signing identity (i.e. certificate
and private key pair) matching the bundle identifier “com.kicksco
ndor.nyancat” were found.
CodeSign error: code signing is required for product type 'Applic
ation' in SDK 'iOS 9.0'
** BUILD FAILED **
The following build commands failed:
        Check dependencies
        (1 failure)

It’s true—this thing it’s saying about the provisioning profile is true. We have no provisioning profile. This isn’t confusing. All error messages are repellant, so, no, you can’t look directly at it, but it’s speaking the truth to you.

Normally, if your program is in Apple’s store, you would go to Apple’s site to fix this. You would follow something like these steps. But we want to use Xcode 7 for this.

If you haven’t intuited this already, you must install Xcode 7.

Go into the Export/iOS folder under the iNyanCat folder. Open the iNyanCat.xcodeproj file.

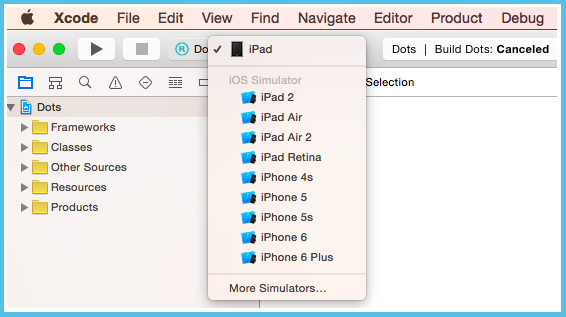
Clicking on the bolded NyanCat project name on the left side of Xcode will show a page with this at the top:

Xcode Identity Settings

And now we create the team profile. From the Team selector, choose Add an account… and enter your Apple ID credentials.

A Fix Issue button will appear. Press it.

Xcode Fix Issue

You may also want to be aware of the Deployment Target area.

The deployment targets in our program's project settings.

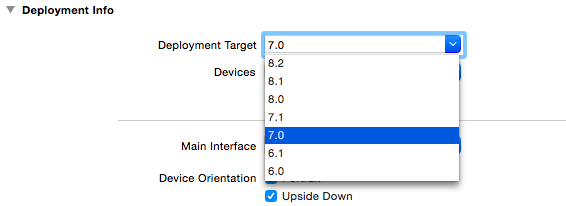
Sometimes upping the version on this will get you through problems.

At this point, you could just run the project from Xcode. (If you want to do that, just click on the arrow in the toolbar—the one that looks like a Play button—but be advised that it will take FOREVER to build.)

So, no, let’s not—let’s head back to the Terminal, as our build was almost complete when we had the provisioning profile problems.

$ openfl test ios

And it should appear on the iPad.

[ 60%] InspectingPackage
[ 60%] TakingInstallLock
[ 65%] PreflightingApplication
[ 65%] InstallingEmbeddedProfile
[ 70%] VerifyingApplication
[ 75%] CreatingContainer
[ 80%] InstallingApplication
[ 85%] PostflightingApplication
[ 90%] SandboxingApplication
[ 95%] GeneratingApplicationMap
[100%] Installed package /Users/kicks/Code/iNyanCat/Export/ios/bu
ild/Release-iphoneos/NyanCat.app

And So Now It Just Works?

Yes, so basically now you can just stick to the Terminal and rebuild your app without needing to do anything with Xcode again.

The only issue that arises is if you want to create another new app.

You will need to edit the project.xml and change the Bundle Identifier in the new project. It’s a different app, it needs its own Id.

You will need to load the xcodeproj file into Xcode and hit Fix Issue again. This will assign this Bundle Identifier to your account. It’s like reserving a spot with Apple.

And then you should be in business for that project.

Problems Unforeseen

I had my share of problems—I will now relive these with you.

First, this one.

[....] Waiting up to 5 seconds for iOS device to be connected
[....] Using (null) (679c2f770cab0a8d8dc691595a8799b6aee88ca0).
------- Install phase -----
[  0%] Found (null) connected through USB, beginning install
Assertion failed: (AMDeviceIsPaired(device)), function handle_
device, file ios-deploy.c, line 1500.

This means your iPad needs to trust. Unlock the iPad and you should see a popup: Trust this computer? Yes, please.

Next problem:

[ 60%] TakingInstallLock
[ 65%] PreflightingApplication
[ 65%] InstallingEmbeddedProfile
[ 70%] VerifyingApplication
AMDeviceInstallApplication failed: 0xE8008015: Your application
failed code-signing checks. Check your certificates, provisioning
profiles, and bundle ids.

I opened Xcode and discovered that the iPad Mini I had hooked up was listed as “ineligible.”

If your device is listed as “ineligible” then this means that the Xcode you’re using doesn’t include a Developer Disk Image for that specific version of iOS. In my case, I had 8.0.2 on the iPad Mini. What on earth causes a missing Developer Disk Image, though? Well, let’s see what’s included in my Xcode 7 installation:

$ ls /Applications/Xcode-beta.app/Contents/Developer/Platforms/iPhoneOS
.platform/DeviceSupport
6.0/            7.0/            8.1/            8.3/            Latest@
6.1/            7.1/            8.2/            9.0 (13A4280e)/

These are the versions I can sideload on to. As you can see, 8.0.2 is not present. The simplest way to solve this is for me to upgrade my iPad Mini to one of these versions.

You may also need to look for a newer Xcode release. I had problems with this because I had upgraded to iOS 8.4 on an iPad, but—as seen above—Xcode didn’t support iOS 8.4 yet. My device was ineligible because it was way too upgraded.

This problem also persisted when I hadn’t loaded symbol files onto the iPad Mini. Return to Xcode and load the xcodeproj file and ensure you can deploy to the device from there—once again, “Fix Issue” is your friend.

Here’s another one that plagued me for awhile.

[ 52%] CreatingStagingDirectory
[ 57%] ExtractingPackage
[ 60%] InspectingPackage
[ 60%] TakingInstallLock
[ 65%] PreflightingApplication
AMDeviceInstallApplication failed: -402653058

I tried upgrading the ios-deploy tool that comes with OpenFL. No good. I tried entering device information into the project.xml. Not that either.

I believe it went away when I started using Xcode to setup the provisioning profile. Xcode will connect to the device and put symbol files on it. You might try using Xcode’s arrow button (looks like a Play button on an audio player) and select your iPad in the area right next to the button. It will take a long time—but it only needs to happen once.

There also was this troublesome error that appeared while openfl test ios was running.

clang: error: -fembed-bitcode is not supported on versions of iOS
prior to 6.0

There are two possible solutions here. First, this is fixed in lime 2.4.8. So run haxelib list and ensure that lime is at least more recent than that. If not, run haxelib upgrade. 👈 Do this anyway—seems intellegent.

Second option is to simply open the XCode project and change the deployment target to (at least) iOS 6.0. (Bitcode enables the Apple Store to optimize your binary, at the cost of losing access to iOS 5.)

chmod: Unable to change file mode on /usr/lib/haxe/lib/lime/2,4,8
/templates/bin/ios-deploy: Operation not permitted
sh: /usr/lib/haxe/lib/lime/2,4,8/templates/bin/ios-deploy: Permis
sion denied

This one can be solved by manually making the file executable using sudo:

sudo chmod 0755 /usr/lib/haxe/lib/lime/2,4,8/templates/bin/ios-deploy

Mongo Bonus Mongo

I also had difficulties getting the MongoDB driver for Haxe going under iOS. It worked fine for local testing (openfl test neko) but not for the device. I got compiler errors.

I forked the driver and made some alterations. Try this.

$ haxelib git mongodb-kicks https://github.com/kickscondor/mongo-haxe-driver

Add then add to your project.xml:

<haxelib name="mongodb-kicks" />

It is nice little touches like this, such as being able to bring in forked code from Github, that make OpenFL such a pleasure—even when it’s in a somewhat crabby mood about having to move itself onto such a suffocating platform such as Apple’s.

UPDATE: Recent versions of Xcode (7.2, for example) have a few different error messages that I thought I would cover also.

------- Install phase -----
[  0%] Found XXX 'DeviceName' (...) connected through USB, beginning install
Assertion failed: (AMDeviceIsPaired(device)), function handle_device,
file ios-deploy.c, line 1500.

This one is a trust issue. Unlock your iPad or iPhone. You should see a dialog box asking if you want to trust this computer. Tap Trust.

You may also need to unplug the device and then plug it back in. This error can persist even after tapping Trust.

[ 65%] PreflightingApplication
[ 65%] InstallingEmbeddedProfile
[ 70%] VerifyingApplication
AMDeviceInstallApplication failed: 0xE8008016: Unknown error.

This is a code-signing issue. You want to use the Fix Issue button in Xcode. (See the And So Now It Just Works? section above for some instructions.)

Lastly, there’s a new popup on iOS that will block your app, with the title Untrusted Developer. The message continues: Your device management settings do not allow using apps from developer “iPhone Developer: [email protected] (XXXX)” on this iPad. You can allow using these apps in Settings.

The solution to this is in iOS Settings. Go to the Settings app. The General settings > tap Profile > tap [email protected] (or whatever the e-mail address was in the warning above.) Now trust [email protected]. And click Verify app. Go back to your app and it should run.

This post accepts webmentions. Do you have the URL to your post?

You may also leave an anonymous comment. All comments are moderated.

PLUNDER THE ARCHIVES

This page is also at kickssy42x7...onion and on hyper:// and ipns://.

MOVING ALONG LET'S SEE MY FAVORITE PLACES I NO LONGER LINK TO ANYTHING THATS VERY FAMOUS

glitchyowl, the future of 'people'.

jack & tals, hipster bait oracles.

maya.land, MAYA DOT LAND.

hypertext 2020 pals: h0p3 level 99 madman + ᛝ ᛝ ᛝ — lucid highly classified scribbles + consummate waifuist chameleon.

yesterweblings: sadness, snufkin, sprite, tonicfunk, siiiimon, shiloh.

surfpals: dang, robin sloan, marijn, nadia eghbal, elliott dot computer, laurel schwulst, subpixel.space (toby), things by j, gyford, also joe jenett (of linkport), brad enslen (of indieseek).

fond friends: jacky.wtf, fogknife, eli, tiv.today, j.greg, box vox, whimsy.space, caesar naples.

constantly: nathalie lawhead, 'web curios' AND waxy

indieweb: .xyz, c.rwr, boffosocko.

nostalgia: geocities.institute, bad cmd, ~jonbell.

true hackers: ccc.de, fffff.at, voja antonić, cnlohr, esoteric.codes.

chips: zeptobars, scargill, 41j.

neil c. "some..."

the world or cate le bon you pick.

all my other links are now at href.cool.