


The Key To Writing Shaders… Varies
The thing—the key—the realization that’s needed before you can write shaders. Really, I think this will help.
Writing shaders has clicked for me today. By shaders, I mean: 3-D shaders, GLSL shaders, OpenGL shaders. They are little programs that draw things. With math. Right on the graphics card.
Being a newb, I can see what tripped me up. The tough thing about shaders is that they aren’t like other programs. They don’t just run once through and there’s your drawing.
Take this circle:

Well, here’s the shader that did that:
varying vec2 v_pos;
void main() {
  float t = step(1.0, length(v_pos));
  gl_FragColor = vec4(0.3, 0.4, 0.7, 1.0 - t);
}
How could THAT POSSIBLY draw a cirCLE?!
The Little Blue Fragments
Let’s start with something easy: why is it blue?
gl_FragColor = vec4(0.3, 0.4, 0.7, 1.0 - t);
This line sets the color of a single pixel. Or—as the shader calls it—a single fragment.
In shaders, colors are represented by a series of four numbers—0.0 to 1.0 for red, green, blue and alpha. The vector of (0.3, 0.4, 0.7) is this blue color. In hex colors, we’re looking at #4C66B2.
Our circle starts its life as a square. I’ve already setup a 200 pixel by 200 pixel canvas. The shader will be painting this entire area.
Oh hey, I know: let’s just set the alpha to 1.0. This means the blue will not be transparent at all—it will be solid.
gl_FragColor = vec4(0.3, 0.4, 0.7, 1.0);
That paints our whole square:

So I am specifically talking about fragment shaders here.
In this fragment shader, we’re now saying, “Paint this pixel solid blue.” And it’s just doing that for every pixel in the square.
200 x 200 = 40,000.
This shader runs—not once—but 40,000 times!
Now Let’s Zoom Out
I’ve setup a canvas that goes from (-1, -1) to (1, 1)—with (0, 0) in the middle—and I’ve told the fragment shader to paint this area.
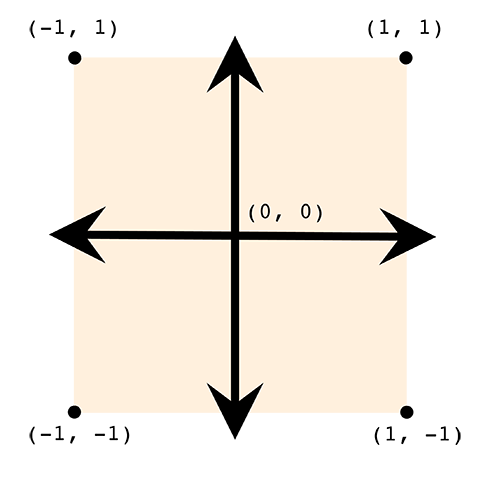
Here we’ve set up four vertices—those are the points on the corners—going from -1 to 1 on each side. We’ll set up OpenGL to pass in these four coordinates—and the vertex shader will pass these on to our fragment shader. And we’re drawing the circle inside that box.
This all seems pretty easy, right? 🤷
Explain This One
Ok, this time, we’re going to go with a dead simple fragment shader:
varying vec4 v_color;
void main() {
  gl_FragColor = v_color;
}
We’re going to pass in the color through a variable.
In order to do this, we need to write a separate vertex shader:
varying vec4 v_color;
void main()
{
  gl_Position = vec4(position, 1.0);
  v_color = vec4(0.3, 0.4, 0.7, 1.0);
}
Not too bad, yeah? We have a variable v_color we’re using to pass the color. And we’re passing the color blue.
The gl_Position variable is passing a corner over—such as (-1, -1) or (1, -1). These were set up in my OpenGL code.
Our vertex shader runs once for every corner; our fragment shader runs for every pixel. Together, they draw the square:
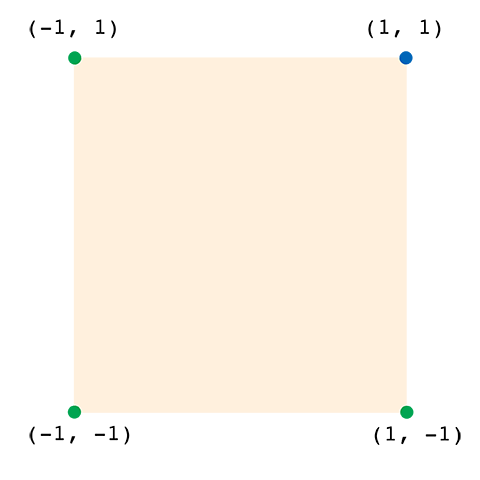
Okie—now let’s make a subtle change. Let’s make it so one corner is blue. The (1, 1) upper right corner will be blue. And the rest will be green.
Our vertex shader could be written like this:
varying vec4 v_color;
void main()
{
  gl_Position = vec4(position,1.0);
  if (position.xy == vec2(1.0, 1.0)) {
    v_color = vec4(0.3, 0.4, 0.7, 1.0);
  } else {
    v_color = vec4(0.3, 0.7, 0.4, 1.0);
  }
}
Ok, good—if the coordinate is (1, 1) then the color will be blue.
And—with that change—we get this:

That makes sense—the upper corner is certainly blue. But how in the world did we get a gradient??
Look at that vector shader again. Shouldn’t just the (1, 1) coordinate be blue? Why is the (0.99, 0.99) coordinate also blue??
Like I Said: It Varies
How do we pass these coordinates to the fragment shader? We use varying.
The key to all of this is varying.
🙌 PLEASE NOTE: More modern OpenGL fragment shaders (such as those in OpenGL 3) use in and out rather than varying. They STILL vary, though!
Now, normally when you pass stuff around in a program, you use a variable.
You might say a = 1. Ok, so now a is one. And it’ll always be one. Until you change it. So a = 911. Now a is nine-eleven. Nice, you turned an innocent variable into a crisis. And it will stay that way.
But WOAH WOAH WOAH—that is NOT what varying is. When you pass something through varying it is not just a variable. It is now a range.
😳 A range??
A crazy, slidy, slippery range.
😳
I’m sorry, it’s true.
🙄 Don’t apologize, I’m sure there’s a reasonable explanation.
Oh, you’re right—I forgot—it’s awesome!! I apologize for apologizing.
Remember how the vertex shader ran once for each corner of the box? Here it is again, so you can look at it.
varying vec4 v_color;
void main()
{
  gl_Position = vec4(position,1.0);
  if (position.xy == vec2(1.0, 1.0)) {
    v_color = vec4(0.3, 0.4, 0.7, 1.0);
  } else {
    v_color = vec4(0.3, 0.7, 0.4, 1.0);
  }
}
The vertex shader DOES color just the corners. Like this:
And then when those colors are passed through the varying variable—mind you, an ACTUAL varying variable!—the fragment shader sees a range from green to blue along the top x-axis and the right y-axis.
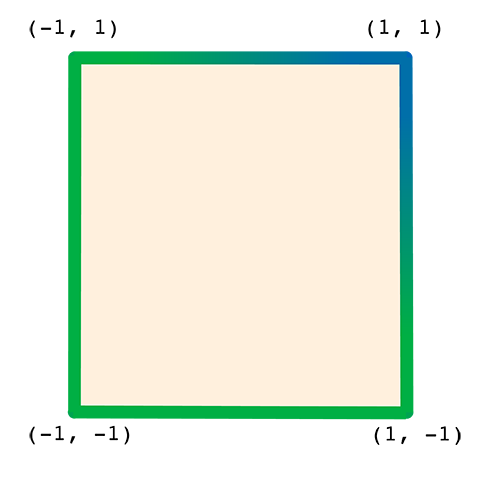
And because of varying, our little v_color is going to be different for every pixel. It’s going to be a color—a vec4, that is—somewhere between green and blue.
It’s going to go smoothly from green to blue, without your interference.
Why did it paint a solid blue earlier? Because all the corners were same. So—even though we used varying—all corners were the same, so all values in between were the same.
Circle Time
Back to our circle. The trick here is: we are going to use—not the varying color—but the varying position to determine if we are inside or outside the circle.
varying vec2 v_pos;
varying vec4 v_color;
void main() {
  float r = length(v_pos);
  v_color.a = 1.0 - step(1.0, r);
  gl_FragColor = v_color;
}
You already understand the color. The vertex shader has given it to us.
What we turn our focus to now are these two built-in functions: step and length.
🙌 SPECIAL NOTE: You can browse a complete list of built-in functions at Shaderific.
The length function gives us the distance of our position from the origin. The origin is the center of our circle. So, in this case, that’s our radius.
float r = length(v_pos);
Now, remember, we’re dealing with a varying variable here, so r is the distance of the current pixel we’re painting from the center.
The length function is also going to get rid of negative values here. The point (-1, -1) has a distance of 1.414, just like the point (1, 1) does.
The step function is going to take everything above 1.0 and make it exactly 1.0. And everything below 1.0 will be 0.0.
So, after step, the value will be 0.0 if we’re inside the circle. And 1.0 if we’re outside it.
See how the shader looks without the step function.

Now—if you want to play with these shaders (in a WebGL-compatible browser), you can do so here. Just go to the upper-right corner and switch to Cube. Which will give you a 2-D plane.
(You can also View Source on this page—this page contains all of its shaders and renders them inline with the text.)
A Few Things You May Still Wonder About
So, even though shaders look a lot like JavaScript or C, they actually have a few syntax differences that make the above codes possible.
Like take this line. How does it make the comparison here?
if (position.xy == vec2(1.0, 1.0)) {
Vector math is built-in with shaders. So you can ask if two vectors are equal using the double-equals.
You can also add, multiply, subtract vectors and so on—just by using the operators.
However, I am comparing a vec4 position with the vec2. And I am using “swizzling”.
position.xy   /* a vec2 */
position.xyz  /* a vec3 */
position.a    /* a float */
This special syntax lets me quickly grab the x, y, z or a parts of a vector.
Composing vectors also has a simplified syntax. Do you remember these lines from our final circle shader?
v_color.a = 1.0 - step(1.0, r);
gl_FragColor = v_color;
This could be simplified. You can use the vec4 function to compose a vector from multiple vectors.
gl_FragColor = vec4(v_color.xyz, 1.0 - step(1.0, r));
Here I am passing in a vec3 and a float—which will be assembled, in order, to form a new vec4. Similarly, I could pass in two vec2 vectors.
As long as your arguments have four parts in total, you can build a vec4 from them. Of course, this is also true of vec2, vec3 and any other type in the GL shader language.